No edit summary Tag: Visual edit |
m (Reverted edits by PW-server-mods-abuse-power (talk) to last revision by BubblySky) Tag: Rollback |
||
| (311 intermediate revisions by 30 users not shown) | |||
| Line 1: | Line 1: | ||
==Daily Bonus== |
==Daily Bonus== |
||
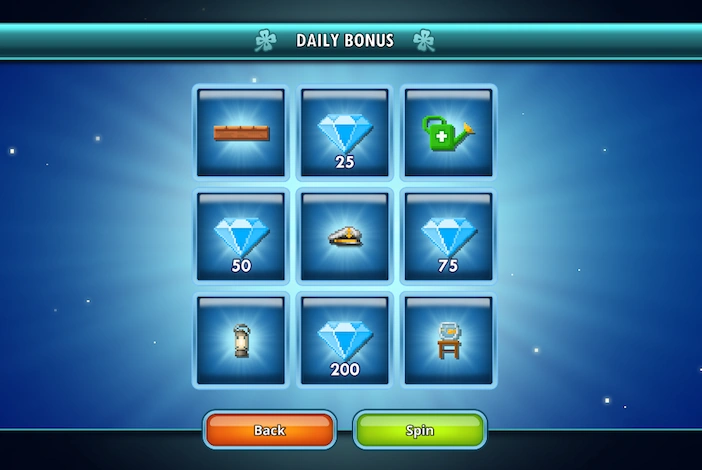
| + | [[File:Dailybonus-0.png|thumb|184x184px|Normal Daily Bonus Reward as of August 2017.]] |
||
| − | [[File:Dailybonus-0.png|thumb|184x184px|Normal DailyBonus Reward as of August 2017.]]'''The daily bonus is one of the functions provided to every player other than those banned from Pixel Worlds. You are eligible to receive a free prize every day in the dynamic world of PIXELSTATION. In the world, go to the "Daily Bonus" and rotate the wheel to get different prizes. For mobile users, you can watch ads to turn on the wheel again and get another prize. The daily bonus is refreshed every 24 hours.''' |
||
| + | The daily bonus is one of the functions provided to every player other than those banned from Pixel Worlds. You are eligible to receive a free prize every day in the dynamic world of PIXELSTATION. In the world, go to the "Daily Bonus" and spin the wheel to get different prizes. For mobile users you can watch an ad to try your luck once again. The daily bonus refreshes every 24 hours. The prizes change every month. |
||
| + | {{Clr}} |
||
| + | {| class="wikitable" style="width: 100%;" |
||
| − | '''The middle prize changes every major update. Most of the middle prizes in standard Daily Bonus can be obtained by crossbreeding, but some of them are not available in any other way.''' |
||
| − | |||
| − | '<nowiki/>''You can get larger prizes in the VIP Daily Bonus which requires your account to have the [[VIP]] status to use'<nowiki/>'''''<nowiki/>''' |
||
| − | |||
| − | == VIP Daily Bonus == |
||
| − | [[File:GrandPrize.jpg|thumb|184x184px|Pink Umbrella VIP Dailybonus Grand Prize as of Feburary 7th, 2018.]]VIP Daily Bonus is an area in the world '''PIXELSTATION''' that is only accessible by players with an active [[VIP]] subscription. |
||
| − | |||
| − | Once in there, [[VIP]] players are able to spin the wheel once and potentially win exclusive prizes as well as the limited VIP Grand Prize. The VIP Daily Bonus refreshes every 24 hours just like its counterpart, the standard Daily Bonus. |
||
| − | |||
| − | In every major update, the VIP Grand Prize item is replaced and the past grand prizes will be unobtainable unless you trade with other players who have them. |
||
| − | |||
| − | All VIP Daily Bonus Grand Prizes: |
||
| − | <gallery hideaddbutton="true" position="center" spacing="medium" widths="75" captionalign="center" navigation="true" bordersize="none" captiontextcolor="#ffffff"> |
||
| − | File:DarkPixelWings.png|Dark Pixie Wings|link=Dark_Pixie_Wings |
||
| − | File:Green_Visor.png|Green Visor|link=Green_Visor |
||
| − | File:GoldenShortSword.png|Golden Short Sword|link=Golden_Short_Sword |
||
| − | File:FrostCape.png|Frost Cape|link=Frost_Cape |
||
| − | File:CherubWings.png|Cherub Wings|link=Cherub_Wings |
||
| − | File:Plaque_Doc_Mask.PNG.png|Plaque Doc Mask|link=Plaque_Doc_Mask |
||
| − | File:Leprechaun'sCape.png|Leprechaun's Cape|link=Leprechaun's_Cape |
||
| − | File:LionHelmet.png|Lion Helmet|link=Lion_Helmet |
||
| − | File:EasterAxe.png|Easter Axe|link=Easter_Axe |
||
| − | File:HorseMask.png|Horse Head Mask|link=Horse_Head_Mask |
||
| − | File:KatanaScabbard.png|Katana Scabbard|link=Katana_Scabbard |
||
| − | File:WaterGun.png|Small Water Gun|link=Small_Water_Gun |
||
| − | File:NinjaPickle.png|Ninja Pickle|link=Ninja_Pickle |
||
| − | File:CleaverSword.png|Cleaver Sword|link=Cleaver_Sword |
||
| − | File:HeadSword.png|Head Sword|link=Head_Sword |
||
| − | File:DarkCherub.png|Dark Cherub Wings|link=Dark_Cherub_Wings |
||
| − | File:NetherBall.png|Nether Ball|link=Nether_Ball |
||
| − | File:FrostSpear.png|Frost Spear|link=Frost_Spear |
||
| − | File:HatRoyale.png|Hat Royale|link=Hat_Royale |
||
| − | File:PinkUmbrella.png|Pink Umbrella|link=Pink_Umbrella |
||
| − | File:GasMask.png|Gas Mask|link=Gas_Mask |
||
| − | File:YellowJumpsuit.png|Yellow Jumpsuit|link=Yellow_Jumpsuit |
||
| − | File:BoxHead.png|Box Head|link=Box_Head |
||
| − | File:StormMask.PNG|Storm Mask|link=Storm_Mask |
||
| − | File:BlackRollerBlades.PNG|Black Roller Blades|link=Black_Roller_Blades |
||
| − | File:Halo.PNG|Halo|link=Halo |
||
| − | File:UnicornHeadMask.png|Unicorn Head Mask|link=Unicorn_Head_Mask |
||
| − | File:Scarecrow_Mask.png|Scarecrow Mask|link=Scarecrow Mask |
||
| − | File:Deep_Sea_Hat.png|Deep Sea Hat|link=Deep_Sea_Hat |
||
| − | File:Snowperson.png|Snowperson|link=Snowperson |
||
| − | File:Axes_Of_Winter.png|Axes Of Winter|link=Axes_Of_Winter |
||
| − | File:Heart_Wings.png|Heart Wings|link=Heart_Wings |
||
| − | File:Goldie_Pot.png|Goldie Pot|link=Goldie_Pot |
||
| − | File:Easter_Faerie_Wings.png|Easter Faerie Wings|link=Easter_Faerie_Wings |
||
| − | File:Space_Feline_Headphones.png|Space Feline Headphones|link=Space_Feline_Headphones |
||
| − | File:Poseidon's_Cape.png|Poseidon's Cape|link=Poseidon's_Cape |
||
| − | File:Mermaid_Tail.png|Mermaid Tail|link=Mermaid_Tail |
||
| − | File:Pixelbot_Mask.png|Pixelbot Mask|link=Pixelbot_Mask |
||
| − | File:Mannequin_Mask.png|Mannequin Mask|link=Mannequin_Mask |
||
| − | File:Kitsune_Mask.png|Kitsune Mask|link=Kitsune_Mask |
||
| − | File:Snow_Owl.png|Snow Owl|link=Snow_Owl |
||
| − | </gallery> |
||
| − | ==PWExchange== |
||
| − | [[File:PWE.png|left|thumb|87x87px]]''The PWExchange. This little fellow on your left can exchange your World Locks into Byte Coins. These Coins are used to buy stuff in the [[PWE Terminal]], which are located around the world PIXELSTATION, or can be bought from the shop for 75,000 [[Gems]]. Byte Coins can also be bought for gems in the "Gems & Coins" section of the shop.'' |
||
| − | <poem> </poem> |
||
| − | |||
| − | <center> |
||
| − | |||
| − | ■ ''1 [[World Lock]] = 219 Byte Coins'' |
||
| − | |||
| − | ■ ''10 [[World Lock]]s = 2 190 Byte Coins'' |
||
| − | |||
| − | ■ ''1 [[Platinum Lock]] = 21 900 Byte Coins'' |
||
| − | |||
| − | ■ ''800 [[Gems]] = 50 Byte Coins'' |
||
| − | |||
| − | ■ ''4 000 [[Gems]] = 250 Byte Coins'' |
||
| − | |||
| − | ■ ''24 000 [[Gems]] = 1500 Byte Coins'' |
||
| − | |||
| − | ■ ''96 000 [[Gems]] = 6000 Byte Coins'' |
||
| − | </center> |
||
| − | |||
| − | == Butterfly Hunt == |
||
| − | [[File:Butter.png|left|thumb|87x87px]] |
||
| − | |||
| − | ''[[Butterflies]] have started to wander in Pixel Worlds. There's a really small chance that a butterfly will spawn in your world, but if you're lucky enough to catch one, be sure to keep as it may be needed in the butterfly questline. There are diurnal and nocturnal [[butterflies]]/moths, which spawn in the day & night. Anyway, here's a list of the current know parts of the questline:'' |
||
| − | <poem> </poem> |
||
| − | {| style="article-table: solid; border-color: #4682B4;" border="2" cellspacing="0" cellpadding="2" align="center" table |
||
|- |
|- |
||
| + | ! colspan="3" | 2016 Daily Bonus Grand Prizes |
||
| − | !'''Part''' |
||
| − | !Description |
||
| − | !Reward |
||
|- |
|- |
||
| + | |{{Tooltip|Pixie Wings|icon=true}} |
||
| − | | style="text-align: center;" |1 |
||
| + | |{{Tooltip|Wolf Hat|icon=true}} |
||
| − | | style="text-align: center;" |''Bring an [[Empress]] Butterfly.'' |
||
| + | |{{Tooltip|Krampus Horns|icon=true}} |
||
| − | | style="text-align: center;" |''150 [[Gems]]'' |
||
|- |
|- |
||
| + | ! colspan="3" | 2017 Daily Bonus Grand Prizes |
||
| − | | style="text-align: center;" |2 |
||
| − | | style="text-align: center;" |''Bring a [[Green Nurse]] Butterfly.'' |
||
| − | | style="text-align: center;" |''150 [[Gems]]'' |
||
|- |
|- |
||
| − | | style=" |
+ | | style="width: 30%;" | {{Tooltip|Short Sword|icon=true}} |
| − | | style=" |
+ | | style="width: 30%;" | {{Tooltip|Top Hat|icon=true}} |
| − | | style=" |
+ | | style="width: 30%;" | {{Tooltip|Heart Glasses|icon=true}} |
|- |
|- |
||
| + | |{{Tooltip|Golden Toilet|icon=true}} |
||
| − | | style="text-align: center;" |4 |
||
| + | |{{Tooltip|Life Vest|icon=true}} |
||
| − | | style="text-align: center;" |''Bring a [[Black Lightning]] Butterfly.'' |
||
| + | |{{Tooltip|Devil Tail|icon=true}} |
||
| − | | style="text-align: center;" |''150 [[Gems]]'' |
||
|- |
|- |
||
| + | |{{Tooltip|Spiky Punk Red|icon=true}} |
||
| − | | style="text-align: center;" |5 |
||
| + | |{{Tooltip|Navy Hat|icon=true}} |
||
| − | | style="text-align: center;" |''Bring a [[Diaper Moth]].'' |
||
| + | |{{Tooltip|Curved Viking Axe|icon=true}} |
||
| − | | style="text-align: center;" |''150 [[Gems]]'' |
||
|- |
|- |
||
| + | |{{Tooltip|Pumpkin Head|icon=true}} |
||
| − | | style="text-align: center;" |6 |
||
| + | |{{Tooltip|Police Hat|icon=true}} |
||
| − | | style="text-align: center;" |''Bring a [[Garden Maid]] Butterfly.'' |
||
| + | |{{Tooltip|Spartan Sword|icon=true}} |
||
| − | | style="text-align: center;" |''150 [[Gems]]'' |
||
|- |
|- |
||
| + | |{{Tooltip|Xmas Sweater 17|icon=true}} |
||
| − | | style="text-align: center;" |7 |
||
| + | |{{Tooltip|Black Cap|icon=true}} |
||
| − | | style="text-align: center;" |''Bring a [[Pearl Heath]] Butterfly.'' |
||
| − | | style="text-align: center;" |''150 [[Gems]]'' |
||
|- |
|- |
||
| + | ! colspan="3" | 2018 Daily Bonus Grand Prizes |
||
| − | | style="text-align: center;" |8 |
||
| − | | style="text-align: center;" |''Bring a [[Siren Hawk Moth]].'' |
||
| − | | style="text-align: center;" |''150 [[Gems]]'' |
||
|- |
|- |
||
| + | |{{Tooltip|Furry Winter Hat|icon=true}} |
||
| − | | style="text-align: center;" |9 |
||
| + | |{{Tooltip|Pink Afro Hair|icon=true}} |
||
| − | | style="text-align: center;" |''Bring a [[Small Tortoiseshell]] Butterfly.'' |
||
| + | |{{Tooltip|St. Patrick's Hoodie|icon=true}} |
||
| − | | style="text-align: center;" |''150 [[Gems]]'' |
||
|- |
|- |
||
| + | |{{Tooltip|Blue Cat Ears|icon=true}} |
||
| − | | style="text-align: center;" |10 |
||
| + | |{{Tooltip|Red Letter Jacket|icon=true}} |
||
| − | | style="text-align: center;" |''Bring a [[Small Brimstone]] Butterfly.'' |
||
| + | |{{Tooltip|Crab Claws|icon=true}} |
||
| − | | style="text-align: center;" |''150 [[Gems]]'' |
||
|- |
|- |
||
| + | |{{Tooltip|Fish Fin Hat|icon=true}} |
||
| − | | style="text-align: center;" |11 |
||
| + | |{{Tooltip|Green Stereos|icon=true}} |
||
| − | | style="text-align: center;" |''Bring a [[White Nun]] Moth.'' |
||
| + | |{{Tooltip|Black Handlebar Moustache|icon=true}} |
||
| − | | style="text-align: center;" |''150 [[Gems]]'' |
||
|- |
|- |
||
| + | |{{Tooltip|Straitjacket|icon=true}} |
||
| − | | style="text-align: center;" |12 |
||
| + | |{{Tooltip|Lucky Hat|icon=true}} |
||
| − | | style="text-align: center;" |''Bring a [[Birch Glider]] Butterfly.'' |
||
| + | |{{Tooltip|Xmas Top Hat|icon=true}} |
||
| − | | style="text-align: center;" |''150 [[Gems]]'' |
||
|- |
|- |
||
| + | ! colspan="3" | 2019 Daily Bonus Grand Prizes |
||
| − | | style="text-align: center;" |13 |
||
| − | | style="text-align: center;" |''Bring a [[Pale Legate]] Butterfly.'' |
||
| − | | style="text-align: center;" |''150 [[Gems]]'' |
||
|- |
|- |
||
| + | |{{Tooltip|Seal Hat|icon=true}} |
||
| − | | style="text-align: center;" |14 |
||
| + | |{{Tooltip|Sunday Hair|icon=true}} |
||
| − | | style="text-align: center;" |''Bring a [[Stud Moth]].'' |
||
| + | |{{Tooltip|Green Kilt|icon=true}} |
||
| − | | style="text-align: center;" |''150 [[Gems]]'' |
||
|- |
|- |
||
| + | |{{Tooltip|Iron Reinforced Shield|icon=true}} |
||
| − | | style="text-align: center;" |15 |
||
| + | |{{Tooltip|Bunny Pants|icon=true}} |
||
| − | | style="text-align: center;" |''Bring a [[Bittywee Hawk Moth]].'' |
||
| + | |{{Tooltip|Decorative Backpack|icon=true}} |
||
| − | | style="text-align: center;" |''150 [[Gems]]'' |
||
|- |
|- |
||
| + | |{{Tooltip|Frog Hat|icon=true}} |
||
| − | | style="text-align: center;" |16 |
||
| + | |{{Tooltip|Straw Hat|icon=true}} |
||
| − | | style="text-align: center;" |''Bring a [[Crush Pearl]] Butterfly.'' |
||
| + | |{{Tooltip|Tiger Ears|icon=true}} |
||
| − | | style="text-align: center;" |''150 [[Gems]]'' |
||
|- |
|- |
||
| + | |{{Tooltip|Cleaver through Head|icon=true}} |
||
| − | | style="text-align: center;" |17 |
||
| + | |{{Tooltip|Silly Tophat|icon=true}} |
||
| − | | style="text-align: center;" |''Bring a [[Dirty Lemon]] Butterfly.'' |
||
| + | |{{Tooltip|Red Baseball Cap|icon=true}} |
||
| − | | style="text-align: center;" |''150 [[Gems]]'' |
||
|- |
|- |
||
| + | ! colspan="3" | 2020 Daily Bonus Grand Prizes |
||
| − | | style="text-align: center;" |18 |
||
| − | | style="text-align: center;" |''Bring a [[Lemon Moth]].'' |
||
| − | | style="text-align: center;" |''150 [[Gems]]'' |
||
|- |
|- |
||
| + | |{{Tooltip|Red Silk Cap|icon=true}} |
||
| − | | style="text-align: center;" |19 |
||
| + | |{{Tooltip|Heart Antennas|icon=true}} |
||
| − | | style="text-align: center;" |''Bring a [[Willowherb Hawk Moth]].'' |
||
| + | |{{Tooltip|Green Headband|icon=true}} |
||
| − | | style="text-align: center;" |''150 [[Gems]]'' |
||
|- |
|- |
||
| + | |{{Tooltip|White Face Mask|icon=true}} |
||
| − | | style="text-align: center;" |20 |
||
| + | |{{Tooltip|Tinfoil Hat|icon=true}} |
||
| − | | style="text-align: center;" |''Bring a [[Green Dwarf]] Butterfly.'' |
||
| + | |{{Tooltip|Strawberry Hat|icon=true}} |
||
| − | | style="text-align: center;" |''150 [[Gems]]'' |
||
|- |
|- |
||
| + | |{{Tooltip|Pot Hat|icon=true}} |
||
| − | | style="text-align: center;" |21 |
||
| + | |{{Tooltip|Traffic Cone Hat|icon=true}} |
||
| − | | style="text-align: center;" |''Bring a [[Red Dot Moth]].'' |
||
| + | |{{Tooltip|Watermelon Helmet|icon=true}} |
||
| − | | style="text-align: center;" |''150 [[Gems]]'' |
||
|- |
|- |
||
| + | |{{Tooltip|Skull Facemask|icon=true}} |
||
| − | | style="text-align: center;" |22 |
||
| + | |{{Tooltip|Red Raincoat|icon=true}} |
||
| − | | style="text-align: center;" |''Bring a [[Blue Dwarf]] Butterfly.'' |
||
| + | |{{Tooltip|Pink puffy Earmuffs|icon=true}} |
||
| − | | style="text-align: center;" |''150 [[Gems]]'' |
||
|- |
|- |
||
| + | ! colspan="3" | 2021 Daily Bonus Grand Prizes |
||
| − | | style="text-align: center;" |23 |
||
| − | | style="text-align: center;" |''Bring a [[Paper Kite]] Butterfly.'' |
||
| − | | style="text-align: center;" |[[Butterfly Scarf|''Butterfly Scarf'']] |
||
|- |
|- |
||
| + | |{{Tooltip|Blue Necktie|icon=true}} |
||
| − | | style="text-align: center;" |24 |
||
| + | |{{Tooltip|Red Oriental Hat|icon=true}} |
||
| − | | style="text-align: center;" |''Bring a [[Tiger Longtail]] Butterfly.'' |
||
| + | |{{Tooltip|Green Hood|icon=true}} |
||
| − | | style="text-align: center;" |''400 [[Gems]]'' |
||
|- |
|- |
||
| + | |{{Tooltip|Golden Eggshell Hat|icon=true}} |
||
| − | | style="text-align: center;" |25 |
||
| + | |{{Tooltip|Albino Cat Ears|icon=true}} |
||
| − | | style="text-align: center;" |''Bring a [[Rose Moth]].'' |
||
| + | |{{Tooltip|Pride Hat|icon=true}} |
||
| − | | style="text-align: center;" |''400 [[Gems]]'' |
||
|- |
|- |
||
| + | |{{Tooltip|Pasta Hat|icon=true}} |
||
| − | | style="text-align: center;" |26 |
||
| + | |{{Tooltip|Blue Headcloth|icon=true}} |
||
| − | | style="text-align: center;" |''Bring a [[Blue Emperor]] Butterfly.'' |
||
| + | |{{Tooltip|Red Tinted Glasses|icon=true}} |
||
| − | | style="text-align: center;" |''400 [[Gems]]'' |
||
|- |
|- |
||
| + | |{{Tooltip|Tentacle Facemask|icon=true}} |
||
| − | | style="text-align: center;" |27 |
||
| + | |{{Tooltip|Black Wool Cap|icon=true}} |
||
| − | | style="text-align: center;" |''Bring a [[Blue-eyed Empress]] Butterfly.'' |
||
| + | |{{Tooltip|Festive Cone Hat|icon=true}} |
||
| − | | style="text-align: center;" |''400 [[Gems]]'' |
||
|- |
|- |
||
| + | ! colspan="3" | Returning Daily Bonus Grand Prizes |
||
| − | | style="text-align: center;" |28 |
||
| − | | style="text-align: center;" |''Bring a [[Camouflage Moth]].'' |
||
| − | | style="text-align: center;" |''400 [[Gems]]'' |
||
|- |
|- |
||
| + | |{{Tooltip|Purple College Jacket|icon=true}} |
||
| − | | style="text-align: center;" |29 |
||
| + | |{{Tooltip|Plunger|icon=true}} |
||
| − | | style="text-align: center;" |''Bring an [[Admiral]] Butterfly.'' |
||
| + | |{{Tooltip|Golf Beret|icon=true}} |
||
| − | | style="text-align: center;" |''400 [[Gems]]'' |
||
|- |
|- |
||
| + | |{{Tooltip|Black Bowing Shirt|icon=true}} |
||
| − | | style="text-align: center;" |30 |
||
| + | |{{Tooltip|Ripped Blue Jeans|icon=true}} |
||
| − | | style="text-align: center;" |''Bring a [[Blue Bottom]] Butterfly.'' |
||
| + | |{{Tooltip|Vested Red Shirt|icon=true}} |
||
| − | | style="text-align: center;" |''400 [[Gems]]'' |
||
|- |
|- |
||
| + | |{{Tooltip|Black Khaleesi Hair|icon=true}} |
||
| − | | style="text-align: center;" |31 |
||
| + | |{{Tooltip|Garibaldi Beard|icon=true}} |
||
| − | | style="text-align: center;" |''Bring a [[Bedstraw Hawk Moth]].'' |
||
| + | |{{Tooltip|Pink Onepiece|icon=true}} |
||
| − | | style="text-align: center;" |''400 [[Gems]]'' |
||
|- |
|- |
||
| + | |{{Tooltip|Red Plaid Shirt|icon=true}} |
||
| − | | style="text-align: center;" |32 |
||
| + | |{{Tooltip|Black Wool Cap|icon=true}} |
||
| − | | style="text-align: center;" |''Bring a [[Shadow Longtail]] Butterfly.'' |
||
| + | |{{Tooltip|Festive Cone Hat|icon=true}} |
||
| − | | style="text-align: center;" |''400 [[Gems]]'' |
||
| − | |- |
||
| − | | style="text-align: center;" |33 |
||
| − | | style="text-align: center;" |''Bring a [[Burp Moth]].'' |
||
| − | | style="text-align: center;" |''400 [[Gems]]'' |
||
| − | |- |
||
| − | | style="text-align: center;" |34 |
||
| − | | style="text-align: center;" |''Bring a [[Pink Delight]] Butterfly.'' |
||
| − | | style="text-align: center;" |[[Butterfly Glasses|''Butterfly Glasses'']] |
||
| − | |- |
||
| − | | style="text-align: center;" |35 |
||
| − | | style="text-align: center;" |''Bring a [[Zebra Longtail]] Butterfly.'' |
||
| − | | style="text-align: center;" |''800 [[Gems]]'' |
||
| − | |- |
||
| − | | style="text-align: center;" |36 |
||
| − | | style="text-align: center;" |''Bring a [[Green Nun]] Butterfly.'' |
||
| − | | style="text-align: center;" |''800 [[Gems]]'' |
||
| − | |- |
||
| − | | style="text-align: center;" |37 |
||
| − | | style="text-align: center;" |''Bring a [[Monkey Bum]] Butterfly.'' |
||
| − | | style="text-align: center;" |''800 [[Gems]]'' |
||
| − | |- |
||
| − | | style="text-align: center;" |38 |
||
| − | | style="text-align: center;" |''Bring a [[Red Orchae]] Butterfly.'' |
||
| − | | style="text-align: center;" |''800 [[Gems]]'' |
||
| − | |- |
||
| − | | style="text-align: center;" |39 |
||
| − | | style="text-align: center;" |''Bring a [[Peacock Moth]].'' |
||
| − | | style="text-align: center;" |''800 [[Gems]]'' |
||
| − | |- |
||
| − | | style="text-align: center;" |40 |
||
| − | | style="text-align: center;" |''Bring a [[Rainbow Chitoria]] Butterfly.'' |
||
| − | | style="text-align: center;" |''800 [[Gems]]'' |
||
| − | |- |
||
| − | | style="text-align: center;" |41 |
||
| − | | style="text-align: center;" |''Bring a [[Neon Striper]] Butterfly.'' |
||
| − | | style="text-align: center;" |''800 [[Gems]]'' |
||
| − | |- |
||
| − | | style="text-align: center;" |42 |
||
| − | | style="text-align: center;" |''Bring a [[Lilium Haste]] Butterfly.'' |
||
| − | | style="text-align: center;" |''800 [[Gems]]'' |
||
| − | |- |
||
| − | | style="text-align: center;" |43 |
||
| − | | style="text-align: center;" |''Bring a [[Peacock Behemoth]].'' |
||
| − | | style="text-align: center;" |''800 [[Gems]]'' |
||
| − | |- |
||
| − | | style="text-align: center;" |44 |
||
| − | | style="text-align: center;" |''Bring a [[Blue Knight]] Butterfly.'' |
||
| − | | style="text-align: center;" |''800 [[Gems]]'' |
||
| − | |- |
||
| − | | style="text-align: center;" |45 |
||
| − | | style="text-align: center;" |''Bring a [[Blood Moth]].'' |
||
| − | | style="text-align: center;" |''800 [[Gems]]'' |
||
| − | |- |
||
| − | | style="text-align: center;" |46 |
||
| − | | style="text-align: center;" |''Bring a [[Yellow Dwarf]] Butterfly.'' |
||
| − | | style="text-align: center;" |[[Rainbow Lenses|''Rainbow Lenses'']] |
||
| − | |- |
||
| − | | style="text-align: center;" |47 |
||
| − | | style="text-align: center;" |''Bring a [[Gray Glass Wing]] Butterfly.'' |
||
| − | | style="text-align: center;" |1, 250 [[Gems]] |
||
| − | |- |
||
| − | | style="text-align: center;" |48 |
||
| − | | style="text-align: center;" |''Bring a [[Poison Wing]] Butterfly.'' |
||
| − | | style="text-align: center;" |1, 250 [[Gems]] |
||
| − | |- |
||
| − | | style="text-align: center;" |49 |
||
| − | | style="text-align: center;" |''Bring a [[Pink Cheeks]] Butterfly.'' |
||
| − | | style="text-align: center;" |1, 250 [[Gems]] |
||
| − | |- |
||
| − | | style="text-align: center;" |50 |
||
| − | | style="text-align: center;" |''Bring a [[Blue Night]] Butterfly.'' |
||
| − | | style="text-align: center;" |1, 250 [[Gems]] |
||
| − | |- |
||
| − | | style="text-align: center;" |51 |
||
| − | | style="text-align: center;" |''Bring an [[Apollon]] Butterfly.'' |
||
| − | | style="text-align: center;" |1, 250 [[Gems]] |
||
| − | |- |
||
| − | | style="text-align: center;" |52 |
||
| − | | style="text-align: center;" |''Bring a [[Lava Moth]].'' |
||
| − | | style="text-align: center;" |1, 250 [[Gems]] |
||
| − | |- |
||
| − | | style="text-align: center;" |53 |
||
| − | | style="text-align: center;" |''Bring a [[Blue Ivory]] Butterfly.'' |
||
| − | | style="text-align: center;" |1, 250 [[Gems]] |
||
| − | |- |
||
| − | | style="text-align: center;" |54 |
||
| − | | style="text-align: center;" |''Bring an [[Skull Hawk Moth]].'' |
||
| − | | style="text-align: center;" |1, 250 [[Gems]] |
||
| − | |- |
||
| − | | style="text-align: center;" |55 |
||
| − | | style="text-align: center;" |''Bring an [[Purple Haze]] Butterfly.'' |
||
| − | | style="text-align: center;" |[[Butterfly Wings]] |
||
| − | |- |
||
| − | | style="text-align: center;" |56 |
||
| − | | style="text-align: center;" |''Bring a [[Pink Heart]] Butterfly.'' |
||
| − | | style="text-align: center;" |''4, 000 [[Gems]]'' |
||
| − | |- |
||
| − | | style="text-align: center;" |57 |
||
| − | | style="text-align: center;" |''Bring a [[Salamander Moth]].'' |
||
| − | | style="text-align: center;" |''4, 000 [[Gems]]'' |
||
| − | |- |
||
| − | | style="text-align: center;" |58 |
||
| − | | style="text-align: center;" |''Bring a [[Night Sky]] Butterfly.'' |
||
| − | | style="text-align: center;" |''4, 000 [[Gems]]'' |
||
| − | |- |
||
| − | | style="text-align: center;" |59 |
||
| − | | style="text-align: center;" |''Bring a [[Polilla Gigante]].'' |
||
| − | | style="text-align: center;" |''4, 000 [[Gems]]'' |
||
| − | |- |
||
| − | | style="text-align: center;" |60 |
||
| − | | style="text-align: center;" |''Bring a [[Lava Aglais]] Butterfly.'' |
||
| − | | style="text-align: center;" |''4, 000 [[Gems]]'' |
||
| − | |- |
||
| − | | style="text-align: center;" |61 |
||
| − | | style="text-align: center;" |''Bring an [[Orange Tiger Tip]] Butterfly.'' |
||
| − | | style="text-align: center;" |''4, 000 [[Gems]]'' |
||
| − | |- |
||
| − | | style="text-align: center;" |62 |
||
| − | | style="text-align: center;" |''Bring an [[Azure Flapper]] Butterfly.'' |
||
| − | | style="text-align: center;" |''4, 000 [[Gems]]'' |
||
| − | |- |
||
| − | | style="text-align: center;" |63 |
||
| − | | style="text-align: center;" |''Bring a [[Violet Colossus]] Butterfly.'' |
||
| − | | style="text-align: center;" |''4, 000 [[Gems]]'' |
||
| − | |- |
||
| − | | style="text-align: center;" |64 |
||
| − | | style="text-align: center;" |''Bring an [[Emerald Hawk Moth]].'' |
||
| − | | style="text-align: center;" |[[Butterfly|''Butterfly'']] |
||
|} |
|} |
||
| − | ==World of the Week== |
||
| − | [[File:WotW Trophy.png|left|thumb|77x77px]]''The World of the Week is a world that Jake and his viewers choose during his streams every Thursday, the world that is chosen gets featured on the World Of The Week section in the Top Rated Worlds. As of the 1.1.30 Update, winners will get a [[WotW Trophy|Wotw Trophy]] and 10 Days of V.I.P. as a reward for their hard work. Click [[World Of The Week List|here]] for the list of World of the Weeks.'' |
||
| − | == |
+ | ==VIP Daily Bonus== |
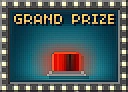
| + | [[File:GrandPrize.png|thumb|191x138px|link=[[Siren Hat]]|<center>[[Siren Hat]]<br />VIP Daily Bonus Grand Prize for the month of September, 2023.</center>]] |
||
| − | [[File:NetherVendor.png|left|thumb|126x126px]]''There is a [[Nether Vendor]] located in the world PIXELSTATION that sells [[Red Scroll]]s and [[Red Portal]] to players for [[Gems]]. These items can also be found into the shop.'' |
||
| + | VIP Daily Bonus is an area in the world PIXELSTATION that is only accessible by players with an active [[VIP]] subscription. |
||
| + | Once in there, [[VIP]] players are able to spin the wheel once and potentially win exclusive prizes as well as the limited VIP Grand Prize. The VIP Daily Bonus refreshes every 24 hours just like its counterpart, the standard Daily Bonus. |
||
| − | ''"Hello there! Want to enter the [[Netherworld]] to fight monsters and loot gems? These scrolls will grant you access."'' |
||
| + | In every major month, the VIP Grand Prize item is replaced and the past grand prizes will be unobtainable unless you trade with other players who have them. |
||
| − | == Daily Quests == |
||
| + | {{Clr}} |
||
| − | <center> |
||
| + | |||
| − | ''Daily Quests are quests that you get on a Daily Basis. You get 3 every 8 hours (the player can't have more than 3 quests at a time), and if you complete them you'll get some sort of reward like Experience Points, Gems & Items. You can cancel a quest if you can't do it or if it is too hard for you. When you complete a quest you'll have to go back to PIXELSTATION so you can retrieve your reward from the Quest Robot. Here is a List of all Daily Quests:'' |
||
| + | {| class="wikitable" style="width: 100%;" |
||
| − | </center> |
||
| − | {| style="article-table: solid; border-color: #4682B4;" border="2" cellspacing="0" cellpadding="2" align="center" table |
||
|- |
|- |
||
| + | ! colspan="3" |2016 VIP Grand Prizes |
||
| − | !'''Quest''' |
||
| − | !Description |
||
| − | !Reward |
||
|- |
|- |
||
| + | |{{Tooltip|Dark Pixie Wings|icon=true}} |
||
| − | | style="text-align: center;" |Bad Hair Day |
||
| + | |{{Tooltip|Frost Cape|icon=true}} |
||
| − | | style="text-align: center;" |Bring [[Brown Paper Bag]]. |
||
| − | | style="text-align: center;" |250 XP |
||
|- |
|- |
||
| + | ! colspan="3" |2017 VIP Grand Prizes |
||
| − | | style="text-align: center;" |Thug-Bot |
||
| − | | style="text-align: center;" |Bring [[Sunglasses]]. |
||
| − | | style="text-align: center;" |150 [[Gems]] |
||
|- |
|- |
||
| + | |{{Tooltip|Green Visor|icon=true}} |
||
| − | | style="text-align: center;" |Art Collector |
||
| + | |{{Tooltip|Golden Short Sword|icon=true}} |
||
| − | | style="text-align: center;" |Bring 12 [[Classic Sculpture]]s. |
||
| + | |{{Tooltip|Cherub Wings|icon=true}} |
||
| − | | style="text-align: center;" |500 [[Gems]] |
||
|- |
|- |
||
| + | |{{Tooltip|Plague Doc Mask|icon=true}} |
||
| − | | style="text-align: center;" |Lock and Lol |
||
| + | |{{Tooltip|Leprechaun's Cape|icon=true}} |
||
| − | | style="text-align: center;" |Bring 1 [[World Lock]]. |
||
| + | |{{Tooltip|Easter Axe|icon=true}} |
||
| − | | style="text-align: center;" |2,000 [[Gems]] |
||
|- |
|- |
||
| + | |{{Tooltip|Lion Helmet|icon=true}} |
||
| − | | style="text-align: center;" |Epic Destroyer |
||
| + | |{{Tooltip|Small Water Gun|icon=true}} |
||
| − | | style="text-align: center;" |Break items worth 500K complexity. |
||
| + | |{{Tooltip|Katana Scabbard|icon=true}} |
||
| − | | style="text-align: center;" |[[Walking Cane]] |
||
|- |
|- |
||
| + | |{{Tooltip|Horse Head Mask|icon=true}} |
||
| − | | style="text-align: center;" |Life is Sweet |
||
| + | |{{Tooltip|Ninja Pickle|icon=true}} |
||
| − | | style="text-align: center;" |Bring [[Strawberry Block]] 100. |
||
| + | |{{Tooltip|Cleaver Sword|icon=true}} |
||
| − | | style="text-align: center;" |250 [[Gems]] |
||
|- |
|- |
||
| + | |{{Tooltip|Head Sword|icon=true}} |
||
| − | | style="text-align: center;" |Legendary Pixelian |
||
| + | |{{Tooltip|Dark Cherub Wings|icon=true}} |
||
| − | | style="text-align: center;" |Gain 25,000 XP points. |
||
| + | |{{Tooltip|Nether Ball|icon=true}} |
||
| − | | style="text-align: center;" |[[Dark World Lock]] |
||
|- |
|- |
||
| + | |{{Tooltip|Frost Spear|icon=true}} |
||
| − | | style="text-align: center;" |Double Gems! |
||
| − | | style="text-align: center;" |Collect 1,000 [[Gems]]. |
||
| − | | style="text-align: center;" |1,000 [[Gems]] |
||
|- |
|- |
||
| + | ! colspan="3" |2018 VIP Grand Prizes |
||
| − | | style="text-align: center;" |Welcome to the Jungle |
||
| − | | style="text-align: center;" |Break 1,000 [[Jungle Grass]]. |
||
| − | | style="text-align: center;" |[[Spiky Punk Green]] |
||
|- |
|- |
||
| + | |{{Tooltip|Hat Royale|icon=true}} |
||
| − | | style="text-align: center;" |Clowning Around |
||
| + | |{{Tooltip|Pink Umbrella|icon=true}} |
||
| − | | style="text-align: center;" |Crossbreed [[Clownsuit|Clown Suit]] Tree. |
||
| + | |{{Tooltip|Gas Mask|icon=true}} |
||
| − | | style="text-align: center;" |250 [[Gems]] |
||
|- |
|- |
||
| + | |{{Tooltip|Yellow Jumpsuit|icon=true}} |
||
| − | | style="text-align: center;" |Merchant Apprentice |
||
| + | |{{Tooltip|Box Head|icon=true}} |
||
| − | | style="text-align: center;" |Trade 5 times. |
||
| + | |{{Tooltip|Storm Mask|icon=true}} |
||
| − | | style="text-align: center;" |150 XP |
||
|- |
|- |
||
| + | |{{Tooltip|Black Roller Blades|icon=true}} |
||
| − | | style="text-align: center;" |Killed by Death |
||
| + | |{{Tooltip|Halo|icon=true}} |
||
| − | | style="text-align: center;" |Die 100 Times. |
||
| + | |{{Tooltip|Unicorn Head Mask|icon=true}} |
||
| − | | style="text-align: center;" |125 XP |
||
|- |
|- |
||
| + | |{{Tooltip|Scarecrow Mask|icon=true}} |
||
| − | | style="text-align: center;" |Mirror Mirror... |
||
| + | |{{Tooltip|Deep Sea Hat|icon=true}} |
||
| − | | style="text-align: center;" |Bring a [[Makeup Table]]. |
||
| + | |{{Tooltip|Snowperson|icon=true}} |
||
| − | | style="text-align: center;" |250 [[Gems]] |
||
|- |
|- |
||
| + | ! colspan="3" |2019 VIP Grand Prizes |
||
| − | | style="text-align: center;" |Obsidian Heist |
||
| − | | style="text-align: center;" |Bring 25 [[Obsidian]] Blocks. |
||
| − | | style="text-align: center;" |100 [[Gems]] |
||
|- |
|- |
||
| + | |{{Tooltip|Axes of Winter|icon=true}} |
||
| − | | style="text-align: center;" |Thirst'o'Bot |
||
| + | |{{Tooltip|Heart Wings|icon=true}} |
||
| − | | style="text-align: center;" |Bring 1 [[Water]] Block |
||
| + | |{{Tooltip|Goldie Pot|icon=true}} |
||
| − | | style="text-align: center;" |250 XP |
||
|- |
|- |
||
| + | |{{Tooltip|Space Feline Headphones|icon=true}} |
||
| − | | style="text-align: center;" |Hot Stuff |
||
| + | |{{Tooltip|Easter Faerie Wings|icon=true}} |
||
| − | | style="text-align: center;" |Break 10 [[Lava]] Blocks. |
||
| + | |{{Tooltip|Poseidon's Cape|icon=true}} |
||
| − | | style="text-align: center;" |[[Classic Sculpture]] |
||
|- |
|- |
||
| + | |{{Tooltip|Mermaid Tail|icon=true}} |
||
| − | | style="text-align: center;" |Master Builder |
||
| + | |{{Tooltip|Pixelbot Mask|icon=true}} |
||
| − | | style="text-align: center;" |Place 1,000 Blocks into a [[Worlds|World]]. |
||
| + | |{{Tooltip|Kitsune Mask|icon=true}} |
||
| − | | style="text-align: center;" |[[Rating Board]] |
||
|- |
|- |
||
| + | |{{Tooltip|Mannequin Mask|icon=true}} |
||
| − | | style="text-align: center;" |My Very Own TV |
||
| + | |{{Tooltip|Snow Owl|icon=true}} |
||
| − | | style="text-align: center;" |Crossbreed [[Old TV]] Tree. |
||
| − | | style="text-align: center;" |250 [[Gems]] |
||
|- |
|- |
||
| + | ! colspan="3" |2020 VIP Grand Prizes |
||
| − | | style="text-align: center;" |Microwave Love |
||
| − | | style="text-align: center;" |Bring 1 [[Microwave]]. |
||
| − | | style="text-align: center;" |[[Red Shard]] |
||
|- |
|- |
||
| + | |{{Tooltip|Crown of the Rat|icon=true}} |
||
| − | | style="text-align: center;" |High Value Smasher |
||
| + | |{{Tooltip|Pegasus Wings|icon=true}} |
||
| − | | style="text-align: center;" |Break items worth 20K complexity. |
||
| + | |{{Tooltip|Old TV Mask|icon=true}} |
||
| − | | style="text-align: center;" |[[World Lock]] |
||
|- |
|- |
||
| + | |{{Tooltip|Liar's Nose|icon=true}} |
||
| − | | style="text-align: center;" |Need for Seed |
||
| + | |{{Tooltip|Hotdog Suit|icon=true}} |
||
| − | | style="text-align: center;" |Bring 100 [[Lava Lamp]] Seeds. |
||
| + | |{{Tooltip|Popsicle Sword|icon=true}} |
||
| − | | style="text-align: center;" |[[White Cap]] |
||
|- |
|- |
||
| + | |{{Tooltip|Crab Hat|icon=true}} |
||
| − | | style="text-align: center;" |Been There, Done That |
||
| + | |{{Tooltip|Boomer-a-Rang|icon=true}} |
||
| − | | style="text-align: center;" |Visit 100 different [[Worlds]]. |
||
| + | |{{Tooltip|Banana Overalls|icon=true}} |
||
| − | | style="text-align: center;" |5000 XP |
||
|- |
|- |
||
| + | |{{Tooltip|Necromancer's Cape|icon=true}} |
||
| − | | style="text-align: center;" |Roses are Red |
||
| + | |{{Tooltip|Big Burgah|icon=true}} |
||
| − | | style="text-align: center;" |Harvest 100 [[Rose]] Trees. |
||
| + | |{{Tooltip|Bytie|icon=true}} |
||
| − | | style="text-align: center;" |250 XP |
||
|- |
|- |
||
| + | ! colspan="3" |2021 VIP Grand Prizes |
||
| − | | style="text-align: center;" |Booster Rooster |
||
| − | | style="text-align: center;" |Buy one [[Booster Packs|Booster]]. |
||
| − | | style="text-align: center;" |500 XP |
||
|- |
|- |
||
| + | |{{Tooltip|Thick Glasses|icon=true}} |
||
| − | | style="text-align: center;" |World Critic |
||
| + | |{{Tooltip|Mask of the Ox|icon=true}} |
||
| − | | style="text-align: center;" |Rate 5 [[Worlds]]. |
||
| + | |{{Tooltip|Pickles Overalls|icon=true}} |
||
| − | | style="text-align: center;" |100 XP |
||
|- |
|- |
||
| + | |{{Tooltip|Bee-Bee|icon=true}} |
||
| − | | style="text-align: center;" |DeeJay's in da House |
||
| + | |{{Tooltip|Crimson Sword|icon=true}} |
||
| − | | style="text-align: center;" |Change background Music. |
||
| + | |{{Tooltip|Clan Bot Mask|icon=true}} |
||
| − | | style="text-align: center;" |20 XP |
||
|- |
|- |
||
| + | |{{Tooltip|Blue Drake Wings|icon=true}} |
||
| − | | style="text-align: center;" |Lumber Bot |
||
| + | |{{Tooltip|Carnivorous Plant Mask|icon=true}} |
||
| − | | style="text-align: center;" |Harvest 100 [[Wood Block]] Trees. |
||
| + | |{{Tooltip|Wee Gully|icon=true}} |
||
| − | | style="text-align: center;" |450 [[Gems]] |
||
|- |
|- |
||
| + | |{{Tooltip|Shadowsuit|icon=true}} |
||
| − | | style="text-align: center;" |Shroom Smasher |
||
| + | |{{Tooltip|Soil Camouflage Suit|icon=true}} |
||
| − | | style="text-align: center;" |Break 50 [[Mushroom]]s. |
||
| + | |{{Tooltip|Hat of the Shark|icon=true}} |
||
| − | | style="text-align: center;" |250 XP |
||
|- |
|- |
||
| + | ! colspan="3" | Returning VIP Grand Prizes |
||
| − | | style="text-align: center;" |Experienced Pixelian |
||
| − | | style="text-align: center;" |Gain 200 XP points. |
||
| − | | style="text-align: center;" |200 [[Gems]] |
||
|- |
|- |
||
| + | |{{Tooltip|Shuriken|icon=true}} |
||
| − | | style="text-align: center;" |X Marks the Spot |
||
| + | |{{Tooltip|Eternal Tears of Sorrow|icon=true}} |
||
| − | | style="text-align: center;" |Bring 1 [[Small Chest]]. |
||
| + | |{{Tooltip|Kitey|icon=true}} |
||
| − | | style="text-align: center;" |5x [[Pile Of Money]] |
||
|- |
|- |
||
| + | |{{Tooltip|Nether Crustal Blade|icon=true}} |
||
| − | | style="text-align: center;" |Smash those Marbles |
||
| + | |{{Tooltip|Lil Swallow|icon=true}} |
||
| − | | style="text-align: center;" |Break 25 [[Marble]] Blocks. |
||
| + | |{{Tooltip|Light Suit|icon=true}} |
||
| − | | style="text-align: center;" |100 [[Gems]] |
||
|- |
|- |
||
| + | |{{Tooltip|Hat Addio|icon=true}} |
||
| − | | style="text-align: center;" |Home Grown Stuff |
||
| + | |{{Tooltip|Poop Hat|icon=true}} |
||
| − | | style="text-align: center;" |Harvest 50 different trees. |
||
| + | |{{Tooltip|Siren Hat|icon=true}} |
||
| − | | style="text-align: center;" |1,500 [[Gems]] |
||
|- |
|- |
||
| + | |{{Tooltip|Candle Hat|icon=true}} |
||
| − | | style="text-align: center;" |Art Vandal |
||
| + | |{{Tooltip|Soil Camouflage Suit|icon=true}} |
||
| − | | style="text-align: center;" |Break 4 [[Classic Painting]]. |
||
| + | |{{Tooltip|Hat of the Shark|icon=true}} |
||
| − | | style="text-align: center;" |250 [[Gems]] |
||
| + | |} |
||
| + | |||
| + | ==PWExchange== |
||
| + | [[File:PWE.png|thumb|87x87px]] |
||
| + | The PWExchange. This little fellow on your left can exchange your {{Tooltip|World Lock|alt=World Locks}} into [[Byte Coins]]. These Coins are used to buy stuff in the {{Tooltip|PWE Terminal|icon=true}}, which are located around the world PIXELSTATION, or can be bought from the shop for 49,000 {{Tooltip|Gems|icon=true}}. [[Byte Coins]] can also be bought for {{Tooltip|Gems|icon=true}} in the "Gems & Coins" section of the shop. |
||
| + | {{Clr}} |
||
| + | |||
| + | <center> |
||
| + | {| class="article-table" |
||
|- |
|- |
||
| + | ! colspan="2" |PWE Exchange exchange prices |
||
| − | | style="text-align: center;" |Cave Digger |
||
| − | | style="text-align: center;" |Break 100 [[Cave Wall]]s. |
||
| − | | style="text-align: center;" |150 XP |
||
|- |
|- |
||
| + | !World Locks/Gems |
||
| − | | style="text-align: center;" |Karaoke Night |
||
| + | !Byte Coins |
||
| − | | style="text-align: center;" |Bring one [[Gramophone]]. |
||
| − | | style="text-align: center;" |[[Microphone]] |
||
|- |
|- |
||
| + | |1x {{Tooltip|World Lock|icon=true}} |
||
| − | | style="text-align: center;" |Magic Stuff Frenzy |
||
| + | |219 {{MiscImage|Byte Coins|scale=0.5}} [[Byte Coins]] |
||
| − | | style="text-align: center;" |Bring 200 [[Magic Stuff]] Blocks. |
||
| − | | style="text-align: center;" |200 [[Gems]] |
||
|- |
|- |
||
| + | |10x {{Tooltip|World Lock|icon=true|alt=World Locks}} |
||
| − | | style="text-align: center;" |Worlds Worth Seeing |
||
| + | |2,190 {{MiscImage|Byte Coins|scale=0.5}} [[Byte Coins]] |
||
| − | | style="text-align: center;" |Visit 5 [[Worlds]]. |
||
| − | | style="text-align: center;" |200 XP |
||
|- |
|- |
||
| + | |1x {{Tooltip|Platinum Lock|icon=true}} |
||
| − | | style="text-align: center;" |Grass Hopper |
||
| + | |21,900 {{MiscImage|Byte Coins|scale=0.5}} [[Byte Coins]] |
||
| − | | style="text-align: center;" |Bring 200 [[Grass]]. |
||
| − | | style="text-align: center;" |200 [[Gems]] |
||
|- |
|- |
||
| + | |800 {{Tooltip|Gems|icon=true}} |
||
| − | | style="text-align: center;" |Decorator |
||
| + | |50 {{MiscImage|Byte Coins|scale=0.5}} [[Byte Coins]] |
||
| − | | style="text-align: center;" |Place 20 [[Props]]. |
||
| − | | style="text-align: center;" |200 XP |
||
|- |
|- |
||
| + | |4,000 {{Tooltip|Gems|icon=true}} |
||
| − | | style="text-align: center;" |Let the World Hear You |
||
| + | |250 {{MiscImage|Byte Coins|scale=0.5}} [[Byte Coins]] |
||
| − | | style="text-align: center;" |Send one Global Message. |
||
| − | | style="text-align: center;" |1,000 XP |
||
|- |
|- |
||
| + | |24,000 {{Tooltip|Gems|icon=true}} |
||
| − | | style="text-align: center;" |Gem Farmer |
||
| + | |1,500 {{MiscImage|Byte Coins|scale=0.5}} [[Byte Coins]] |
||
| − | | style="text-align: center;" |Collect 500 [[Gems]]. |
||
| − | | style="text-align: center;" |500 XP |
||
|- |
|- |
||
| + | |96,000 {{Tooltip|Gems|icon=true}} |
||
| − | | style="text-align: center;" |Familiar Foodie |
||
| + | |6,000 {{MiscImage|Byte Coins|scale=0.5}} [[Byte Coins]] |
||
| − | | style="text-align: center;" |Bring 1 [[World Lock]] |
||
| + | |} |
||
| − | | style="text-align: center;" |3 [[Blue Cookie]] |
||
| + | </center> |
||
| + | |||
| + | ==Butterfly Hunt== |
||
| + | [[File:Butter.png|thumb|87x87px]] |
||
| + | {{Main|Butterfly Hunt}} |
||
| + | |||
| + | ==Item Bank== |
||
| + | [[File:Bank Bot1.png|100x100px|thumb]] |
||
| + | |||
| + | The Item Bank is located right between the Clans and Pet Shop section. The interior can be described like this: large vault door with a [[Bank Bot]] beside it. In here, players will most likely encounter the Bank system of Pixel Worlds for the first time. The bot can also be purchased in the [[Item Packs|Shop]] for 17,500 {{Tooltip|Gems|icon=true}}. The {{Tooltip|Bank Bot|icon=true}} allow players to store any items, including untradeable ones. However, they would have to purchase slots in the Bank using {{Tooltip|Gems|icon=true}} to store more items. Here is the list of how much it costs to purchase more slots in the Bank: |
||
| + | {| class="mw-collapsible mw-collapsed wikitable" border="2" cellspacing="0" cellpadding="2" align="center" table |
||
|- |
|- |
||
| + | !Slots |
||
| − | | style="text-align: center;" |Ice Cream Tasting |
||
| + | !Cost |
||
| − | | style="text-align: center;" |Bring 50 [[Ice Cream Cone|Ice Cream Cones]]. |
||
| − | | style="text-align: center;" |[[Blue Candy]] |
||
|- |
|- |
||
| + | |5 |
||
| − | | style="text-align: center;" |Feeding Time |
||
| + | |8,250 {{Tooltip|Gems|icon=true}} |
||
| − | | style="text-align: center;" |Crossbreed a [[FFM|Familiar Food Machine]]. |
||
| − | | style="text-align: center;" |2,000 [[Gems]] |
||
|- |
|- |
||
| + | |10 |
||
| − | | style="text-align: center;" |Upgrade to HD |
||
| + | |18,000 {{Tooltip|Gems|icon=true}} |
||
| − | | style="text-align: center;" |Break 15 [[Old TV]]s. |
||
| − | | style="text-align: center;" |[[Flat Screen TV]] |
||
|- |
|- |
||
| + | |15 |
||
| − | | style="text-align: center;" |Tasting time |
||
| + | |42,000 {{Tooltip|Gems|icon=true}} |
||
| − | | style="text-align: center;" |Bring 1 [[Blue Sandwich]]. |
||
| − | | style="text-align: center;" |4,000 [[Gems]] |
||
|- |
|- |
||
| + | |20 |
||
| − | | style="text-align: center;" |Glass Artisan |
||
| + | |? {{Tooltip|Gems|icon=true}} |
||
| − | | style="text-align: center;" |Harvest 100 [[Glass Block]] Trees. |
||
| − | | style="text-align: center;" |1,000 [[Gems]] |
||
|- |
|- |
||
| + | |25 |
||
| − | | style="text-align: center;" |Jelly Smasher |
||
| + | |? {{Tooltip|Gems|icon=true}} |
||
| − | | style="text-align: center;" |Destroy 500 [[Clear Jelly]]. |
||
| − | | style="text-align: center;" |[[Vortex Portal]] |
||
|- |
|- |
||
| + | |} |
||
| − | | style="text-align: center;" |Master Decorator |
||
| + | |||
| − | | style="text-align: center;" |Place 200 [[Props]]. |
||
| + | ==Pet Shop== |
||
| − | | style="text-align: center;" |1,000 XP |
||
| + | [[File:Pet_Shop.png|thumb]] |
||
| + | {{Main|Pet Guide}} |
||
| + | |||
| + | The owner of the Pet Shop, Christina, together with her sister, Nelly, lets you exchange either {{Tooltip|Bronze Bubblegum Token|icon=true}}, {{Tooltip|Silver Bubblegum Token|icon=true}} or {{Tooltip|Golden Bubblegum Token|icon=true}} for rare items such as {{Tooltip|Spectrum Gun|icon=true}} and {{Tooltip|Spectrum Jetpack|icon=true}}. Both Christina and Nelly are obsessed about bubblegum! They love to blow big bubbles! |
||
| + | |||
| + | {| class="mw-collapsible mw-collapsed wikitable" border="2" cellspacing="0" cellpadding="2" align="center" table |
||
|- |
|- |
||
| + | !Item |
||
| − | | style="text-align: center;" |Quack Quack |
||
| + | !Cost |
||
| − | | style="text-align: center;" |Bring 1 [[Sign]]. |
||
| − | | style="text-align: center;" |10 [[Rubber Duck]]s |
||
|- |
|- |
||
| + | |{{Tooltip|Spectrum Hair|icon=true}} |
||
| − | | style="text-align: center;" |From Snow To Sand |
||
| + | |50x {{Tooltip|Bronze Bubblegum Token|icon=true|alt=Bronze Bubblegum Tokens}} |
||
| − | | style="text-align: center;" |Bring 50 Sand Blocks. |
||
| − | | style="text-align: center;" |[[Brown Paper Bag]] |
||
|- |
|- |
||
| + | |{{Tooltip|Spectrum Visor|icon=true}} |
||
| − | | style="text-align: center;" |Getting A Haircut |
||
| + | |40x {{Tooltip|Silver Bubblegum Token|icon=true|alt=Silver Bubblegum Tokens}} |
||
| − | | style="text-align: center;" |Bring 5 [[Buzzsaw]]s. |
||
| − | | style="text-align: center;" |[[Black Buzzcut]] |
||
|- |
|- |
||
| + | |{{Tooltip|Spectrum Necklace|icon=true}} |
||
| − | | style="text-align: center;" |Corn Crop |
||
| + | |10x {{Tooltip|Golden Bubblegum Token|icon=true|alt=Golden Bubblegum Tokens}} |
||
| − | | style="text-align: center;" |Break 50 [[Corn]]. |
||
| − | | style="text-align: center;" |300 XP |
||
|- |
|- |
||
| + | |{{Tooltip|Spectrum Lenses|icon=true}} |
||
| − | | style="text-align: center;" |Cowboy Time |
||
| + | |20x {{Tooltip|Golden Bubblegum Token|icon=true|alt=Golden Bubblegum Tokens}} |
||
| − | | style="text-align: center;" |Bring a [[Stetson Hat]]. |
||
| − | | style="text-align: center;" |350 XP |
||
|- |
|- |
||
| + | |{{Tooltip|Spectrum Sword|icon=true}} |
||
| − | | style="text-align: center;" |Rock-bot |
||
| + | |30x {{Tooltip|Golden Bubblegum Token|icon=true|alt=Golden Bubblegum Tokens}} |
||
| − | | style="text-align: center;" |Harvest 100 [[Granite]] Block Trees. |
||
| − | | style="text-align: center;" |250 [[Gems]] |
||
|- |
|- |
||
| + | |{{Tooltip|Spectrum Gun|icon=true}} |
||
| − | | style="text-align: center;" |Go out and Play |
||
| + | |75x {{Tooltip|Golden Bubblegum Token|icon=true|alt=Golden Bubblegum Tokens}} |
||
| − | | style="text-align: center;" |Kill 10 Players in Battle. |
||
| − | | style="text-align: center;" |250 [[Gems]] |
||
|- |
|- |
||
| + | |{{Tooltip|Spectrum Halo|icon=true}} |
||
| − | | style="text-align: center;" |Fearless Fighter |
||
| + | |50x {{Tooltip|Golden Bubblegum Token|icon=true|alt=Golden Bubblegum Tokens}} |
||
| − | | style="text-align: center;" |Kill 30 Players in Battle. |
||
| − | | style="text-align: center;" |[[Checkpoint]] or other items |
||
|- |
|- |
||
| + | |{{Tooltip|Spectrum Wings|icon=true}} |
||
| − | | style="text-align: center;" |Bring Me Victory |
||
| + | |80x {{Tooltip|Golden Bubblegum Token|icon=true|alt=Golden Bubblegum Tokens}} |
||
| − | | style="text-align: center;" |Kill 100 Players in Battle. |
||
| − | | style="text-align: center;" |2 [[Portal|Portals]] or other items |
||
|- |
|- |
||
| + | |{{Tooltip|Spectrum Jetpack|icon=true}} |
||
| − | | style="text-align: center;" |Rampage Hunter |
||
| + | |150x {{Tooltip|Golden Bubblegum Token|icon=true|alt=Golden Bubblegum Tokens}} |
||
| − | | style="text-align: center;" |Kill 1000 Players in Battle. |
||
| + | |} |
||
| − | | style="text-align: center;" |1 Day [[VIP]] |
||
| + | |||
| + | ==World of the Week== |
||
| + | [[File:WotW Trophy.png|thumb|75x75px|link=WotW Trophy]] |
||
| + | |||
| + | Every week, the developers select a world made by players that will be nominated as the World of the Week. The chosen world gets featured in the World of the Week section in the Top Rated Worlds and in the Pixel Station's WOTW section. As of the 1.1.30 Update, winners will get a {{Tooltip|WotW Trophy|icon=true}} and 10 Days of [[VIP]] as a reward for their hard work. Click [[World of the Week List|here]] for the list of World of the Weeks. |
||
| + | |||
| + | ==Netherworld== |
||
| + | [[File:NetherVendor.png|thumb|126x126px]] |
||
| + | |||
| + | The [[Nether Vendor]] is located on the bottom-left side corner of PIXELSTATION that sells {{Tooltip|Red Scroll|icon=true|alt=Red Scrolls}} and {{Tooltip|Red Portal|icon=true}} to players for {{Tooltip|Gems|icon=true}}. These items can also be found in the [[Special_Item_Pack|shop]]. |
||
| + | |||
| + | "Hello there! Want to enter the [[Netherworld]] to fight monsters and loot gems? These scrolls will grant you access." |
||
| + | |||
| + | If you see him in the Netherworld, be careful about what he says, he might carrying some...secrets... |
||
| + | |||
| + | ==Daily Quests== |
||
| + | {{Main|Daily Quests}} |
||
| + | |||
| + | Daily Quests are quests that players get on a Daily Basis. Players get 3 quests every 4 hours (they can't have more than 3 quests at a time and the timing is reduced to 2 hours if the Quest Hoarder perk is equipped), completing them will yield some rewards such as {{Tooltip|XP}}, {{Tooltip|Gems|icon=true}} or Items. Players can cancel a quest at any time and a new quest will appear after 4 hours(2 hours with perk equipped). |
||
| + | |||
| + | ==Old Fisherman== |
||
| + | [[File:Old_Fisherman_NPC.png|thumb|130x130px]] |
||
| + | Old Fisherman provides basic information about fishing, and is located in the [[Fishing|"Fishing"]] section in Pixel Station. He has a portal leading to [[FISHING-101]] to his right. |
||
| + | |||
| + | ==Fishmonger== |
||
| + | [[File:Fishmonger.png|thumb|130x130px]] |
||
| + | |||
| + | The Fishmonger buys all types of fishes for a certain ammount of {{Tooltip|Gems|icon=true}} which depends on three factors, the size, the specie and the ammount. You can find The Fishmonger on the [[Pixel Station]] or you can directly sell your fish through a {{Tooltip|Fish Barrel|icon=true}}, the prices for all the species and their respective sizes are listed below: |
||
| + | |||
| + | '''Note: The [[Fishes]]' images are the Huge versions of the fish.''' |
||
| + | |||
| + | {| class="mw-collapsible mw-collapsed wikitable" border="2" cellpadding="12" cellspacing="0" align="center" table |
||
|- |
|- |
||
| + | !Fish |
||
| − | | style="text-align: center;" |Nether 1 |
||
| + | ! Tiny |
||
| − | | style="text-align: center;" |Kill 20 Flame Jumpers in [[Netherworld]]. |
||
| + | !Small |
||
| − | | style="text-align: center;" |[[Nether Crystal|Crystals]], Red Scrolls or part of the [[Netherworld|Nether Armor Set]]. |
||
| + | !Medium |
||
| + | !Large |
||
| + | !Huge |
||
|- |
|- |
||
| + | |{{ItemImage|Herring (Huge)}} [[Herring]] |
||
| − | | style="text-align: center;" |Nether 2 |
||
| + | |10 {{Tooltip|Gems}} |
||
| − | | style="text-align: center;" |Kill 20 Flame Flyers in [[Netherworld]]. |
||
| + | |40 {{Tooltip|Gems}} |
||
| − | | style="text-align: center;" |[[Nether Crystal|Crystals]], Red Scrolls or part of the [[Netherworld|Nether Armor Set]]. |
||
| + | |70 {{Tooltip|Gems}} |
||
| + | |100 {{Tooltip|Gems}} |
||
| + | |300 {{Tooltip|Gems}} |
||
|- |
|- |
||
| + | |{{ItemImage|Kingfish (Huge)}} [[Kingfish]] |
||
| − | | style="text-align: center;" |Nether 3 |
||
| + | |10 {{Tooltip|Gems}} |
||
| − | | style="text-align: center;" |Kill 20 Flame Chargers in [[Netherworld]]. |
||
| + | |40 {{Tooltip|Gems}} |
||
| − | | style="text-align: center;" |[[Nether Crystal|Crystals]], Red Scrolls or part of the [[Netherworld|Nether Armor Set]]. |
||
| + | |70 {{Tooltip|Gems}} |
||
| + | |100 {{Tooltip|Gems}} |
||
| + | |300 {{Tooltip|Gems}} |
||
|- |
|- |
||
| + | |{{ItemImage|Goldfish (Huge)}} [[Goldfish]] |
||
| − | | style="text-align: center;" |Nether 4 |
||
| + | |15 {{Tooltip|Gems}} |
||
| − | | style="text-align: center;" |Kill 20 Abyss Walkers in [[Netherworld]]. |
||
| + | |60 {{Tooltip|Gems}} |
||
| − | | style="text-align: center;" |[[Nether Crystal|Crystals]], Red Scrolls or part of the [[Netherworld|Nether Armor Set]]. |
||
| + | |105 {{Tooltip|Gems}} |
||
| + | |150 {{Tooltip|Gems}} |
||
| + | |600 {{Tooltip|Gems}} |
||
|- |
|- |
||
| + | |{{ItemImage|Butterflyfish (Huge)}} [[Butterflyfish]] |
||
| − | | style="text-align: center;" |Nether 5 |
||
| + | |15 {{Tooltip|Gems}} |
||
| − | | style="text-align: center;" |Kill 20 Robe Casters in [[Netherworld]]. |
||
| + | |60 {{Tooltip|Gems}} |
||
| − | | style="text-align: center;" |[[Nether Crystal|Crystals]], Red Scrolls or part of the [[Netherworld|Nether Armor Set]]. |
||
| + | |105 {{Tooltip|Gems}} |
||
| + | |150 {{Tooltip|Gems}} |
||
| + | |600 {{Tooltip|Gems}} |
||
|- |
|- |
||
| + | |{{ItemImage|Carp (Huge)}} [[Carp]] |
||
| − | | style="text-align: center;" |Nether 6 |
||
| + | |20 {{Tooltip|Gems}} |
||
| − | | style="text-align: center;" |Kill 10 Tentacle Shooters in [[Netherworld]]. |
||
| + | |80 {{Tooltip|Gems}} |
||
| − | | style="text-align: center;" |[[Nether Crystal|Crystals]], Red Scrolls or part of the [[Netherworld|Nether Armor Set]]. |
||
| + | |140 {{Tooltip|Gems}} |
||
| + | |200 {{Tooltip|Gems}} |
||
| + | |600 {{Tooltip|Gems}} |
||
|- |
|- |
||
| + | |{{ItemImage|Halibut (Huge)}} [[Halibut]] |
||
| − | | style="text-align: center;" |Nether 7 |
||
| + | |20 {{Tooltip|Gems}} |
||
| − | | style="text-align: center;" |Kill 20 Staff Casters in [[Netherworld]]. |
||
| + | |80 {{Tooltip|Gems}} |
||
| − | | style="text-align: center;" |[[Nether Crystal|Crystals]], Red Scrolls or part of the [[Netherworld|Nether Armor Set]]. |
||
| + | |140 {{Tooltip|Gems}} |
||
| + | |200 {{Tooltip|Gems}} |
||
| + | | 600 {{Tooltip|Gems}} |
||
|- |
|- |
||
| + | |{{ItemImage|Sea Angler (Huge)}} [[Sea Angler]] |
||
| − | | style="text-align: center;" |Nether 8 |
||
| + | |30 {{Tooltip|Gems}} |
||
| − | | style="text-align: center;" |Kill 20 Nether Wraiths in [[Netherworld]]. |
||
| + | |120 {{Tooltip|Gems}} |
||
| − | | style="text-align: center;" |[[Nether Crystal|Crystals]], Red Scrolls or part of the [[Netherworld|Nether Armor Set]]. |
||
| + | |210 {{Tooltip|Gems}} |
||
| + | |300 {{Tooltip|Gems}} |
||
| + | |900 {{Tooltip|Gems}} |
||
|- |
|- |
||
| + | |{{ItemImage|Tuna (Huge)}} [[Tuna]] |
||
| − | | style="text-align: center;" |Excavator |
||
| + | |40 {{Tooltip|Gems}} |
||
| − | | style="text-align: center;" |Bring 200 [[Sandstone]] seeds. |
||
| + | |160 {{Tooltip|Gems}} |
||
| − | | style="text-align: center;" |5, 10, 20 [[Bone Dust]] or 1 [[Fossil]]. |
||
| + | |280 {{Tooltip|Gems}} |
||
| + | |400 {{Tooltip|Gems}} |
||
| + | |1,200 {{Tooltip|Gems}} |
||
|- |
|- |
||
| + | |{{ItemImage|Acid Puffer (Huge)}} [[Acid Puffer]] |
||
| − | | style="text-align: center;" |Block Buyer |
||
| + | |80 {{Tooltip|Gems}} |
||
| − | | style="text-align: center;" |Buy 100 blocks from [[PWE Terminal]] |
||
| + | |320 {{Tooltip|Gems}} |
||
| − | | style="text-align: center;" |50 [[Byte Coins]] |
||
| + | |560 {{Tooltip|Gems}} |
||
| − | |}[[Category:Information]] |
||
| + | |800 {{Tooltip|Gems}} |
||
| + | |2,400 {{Tooltip|Gems}} |
||
| + | |- |
||
| + | |{{ItemImage|Dumb Fish (Huge)}} [[Dumb Fish]] |
||
| + | |5 {{Tooltip|Gems}} |
||
| + | |10 {{Tooltip|Gems}} |
||
| + | |30 {{Tooltip|Gems}} |
||
| + | |50 {{Tooltip|Gems}} |
||
| + | |100 {{Tooltip|Gems}} |
||
| + | |- |
||
| + | |{{ItemImage|Piranha (Huge)}} [[Piranha]] |
||
| + | |30 {{Tooltip|Gems}} |
||
| + | |120 {{Tooltip|Gems}} |
||
| + | |210 {{Tooltip|Gems}} |
||
| + | |300 {{Tooltip|Gems}} |
||
| + | |900 {{Tooltip|Gems}} |
||
| + | |- |
||
| + | |{{ItemImage|Crab (Huge)}} [[Crab]] |
||
| + | |320 {{Tooltip|Gems}} |
||
| + | |1280 {{Tooltip|Gems}} |
||
| + | |2240 {{Tooltip|Gems}} |
||
| + | |3200 {{Tooltip|Gems}} |
||
| + | |9600 {{Tooltip|Gems}} |
||
| + | |} |
||
| + | |||
| + | ==Fisherman's Fashion== |
||
| + | [[File:Fisherman's_Fashion.png|thumb|115x93px]] |
||
| + | {{Main|Fisherman's Fashion|title=Fishing Gear}} |
||
| + | |||
| + | Fisherman's Fashion can be found in the Pixel Station. You can buy items from the vendor that can improve various fishing skills and you must have certain [[Ingredients#Fishing|Fishing Ingredients]] and amount of {{Tooltip|Gems|icon=true}} to buy the items. The items available can be found below with all the necessary information: |
||
| + | {{Clr}} |
||
| + | |||
| + | ==Tournaments and World Records== |
||
| + | [[File:Tournaments & World Records.png|thumb|132x132px]] |
||
| + | |||
| + | {{Main|Fishing}} |
||
| + | In this section you can find information about the Fishing Tournaments and the current world records related to the [[Fishes|Fish]] weights of each type. |
||
| + | |||
| + | Fishing tournaments are a weekly event in which you can take part by buying a Cup Ticket, although when you buy a ticket for a certain Cup you can't enter in other ones. Once you buy it, you will have a limited amount of time to score points for the tournament, if you're not happy with your score you can try to improve it by buying new Cup Ticket's. Each Cup has different aims and prizes. |
||
| + | |||
| + | '''Important Note:''' |
||
| + | ''Once a ticket is active, the fishes you catch which are admitted in the tournament will not be kept in your inventory!'' |
||
| + | |||
| + | <tabber> |
||
| + | Baby Cup= |
||
| + | ===Baby Cup=== |
||
| + | [[File:Baby Cup.png|thumb|200x110px]] |
||
| + | The price of each Cup Ticket for this tournament is 10 {{MiscImage|Byte Coins|scale=0.5}} [[Byte Coins]], more information below: |
||
| + | |||
| + | <center> |
||
| + | <div style="width:400px; text-align:left"> |
||
| + | '''Baby Cup Weight Competition Rules:''' |
||
| + | *Species Allowed: All or just a specific specie |
||
| + | *Sizes Allowed: Tiny, Small, Medium |
||
| + | *Rod Types Allowed: All |
||
| + | *Gear: Allowed |
||
| + | </div> |
||
| + | </center> |
||
| + | <center> |
||
| + | |||
| + | <div style="width:400px; text-align:left"> |
||
| + | '''Baby Cup Prizes:''' |
||
| + | |||
| + | *1st Place - 60,000 {{Tooltip|Gems|icon=true}} and {{Tooltip|Golden Baby Cup Trophy|icon=true}} |
||
| + | *2nd Place - 40,000 {{Tooltip|Gems|icon=true}} and {{Tooltip|Silver Baby Cup Trophy|icon=true}} |
||
| + | *3rd Place - 20,000 {{Tooltip|Gems|icon=true}} and {{Tooltip|Bronze Baby Cup Trophy|icon=true}} |
||
| + | *Place 4-10 - 10,000 {{Tooltip|Gems|icon=true}} |
||
| + | *Place 11-50 - 7,000 {{Tooltip|Gems|icon=true}} |
||
| + | *Place 51-100 - 4,000 {{Tooltip|Gems|icon=true}} |
||
| + | </div> |
||
| + | </center> |
||
| + | |||
| + | |||
| + | |-|Fisherman's Cup= |
||
| + | ===Fisherman's Cup=== |
||
| + | [[File:Fisherman's Cup.png|thumb|200x110px]] |
||
| + | The price of each ticket for this tournament is 20 {{MiscImage|Byte Coins|scale=0.5}} [[Byte Coins]], more information below: |
||
| + | |||
| + | <center> |
||
| + | <div style="width:400px; text-align:left"> |
||
| + | '''Fisherman's Cup Weight Competition Rules:''' |
||
| + | *Species Allowed: All or just a specific specie |
||
| + | *Sizes Allowed: Small, Medium and Large |
||
| + | *Rod Types Allowed: All |
||
| + | *Gear: Allowed |
||
| + | </div> |
||
| + | </center> |
||
| + | <center> |
||
| + | |||
| + | <div style="width:400px; text-align:left"> |
||
| + | '''Fisherman's Cup Prizes:''' |
||
| + | |||
| + | *1st Place - 120,000 {{Tooltip|Gems|icon=true}} and {{Tooltip|Golden Fisherman's Cup Trophy|icon=true}} |
||
| + | *2nd Place - 80,000 {{Tooltip|Gems|icon=true}} and {{Tooltip|Silver Fisherman's Cup Trophy|icon=true}} |
||
| + | *3rd Place - 40,000 {{Tooltip|Gems|icon=true}} and {{Tooltip|Bronze Fisherman's Cup Trophy|icon=true}} |
||
| + | *Place 4-10 - 20,000 {{Tooltip|Gems|icon=true}} |
||
| + | *Place 11-50 - 10,000 {{Tooltip|Gems|icon=true}} |
||
| + | </div> |
||
| + | </center> |
||
| + | |||
| + | |-|Pro Cup= |
||
| + | ===Pro Cup=== |
||
| + | [[File:Pro Cup.png|thumb|200x110px]] |
||
| + | The price of each ticket for this tournament is 40 {{MiscImage|Byte Coins|scale=0.5}} [[Byte Coins]], more information below: |
||
| + | |||
| + | <center> |
||
| + | <div style="width:400px; text-align:left"> |
||
| + | '''Pro Cup Weight Competition Rules:''' |
||
| + | *''Species Allowed: All or just a specific specie'' |
||
| + | *''Sizes Allowed: Medium, Large, Huge'' |
||
| + | *''Rod Types Allowed: All'' |
||
| + | *''Gear: Allowed'' |
||
| + | </div> |
||
| + | </center> |
||
| + | <center> |
||
| + | |||
| + | <div style="width:400px; text-align:left"> |
||
| + | '''Pro Cup Prizes:''' |
||
| + | |||
| + | *1st Place - 250,000 {{Tooltip|Gems|icon=true}} and {{Tooltip|Golden Pro Cup Trophy|icon=true}} |
||
| + | *2nd Place - 150,000 {{Tooltip|Gems|icon=true}} and {{Tooltip|Silver Pro Cup Trophy|icon=true}} |
||
| + | *3rd Place - 100,000 {{Tooltip|Gems|icon=true}} and {{Tooltip|Bronze Pro Cup Trophy|icon=true}} |
||
| + | *Place 4-10 - 40,000 {{Tooltip|Gems|icon=true}} |
||
| + | *Place 11-25 - 20,000 {{Tooltip|Gems|icon=true}} |
||
| + | </tabber> |
||
| + | |||
| + | ==Clans== |
||
| + | [[File:ClanNPC.png|thumb|100x100px]] |
||
| + | |||
| + | {{Main|Clans}} |
||
| + | Clans section is located above the butterfly Section of the Pixel Station. There is a Clan NPC located in the section that provides brief description about clans. The NPC is useful for new players. |
||
| + | ==Mining== |
||
| + | [[File:Mining Gear NPC.png|thumb|200x110px]] |
||
| + | |||
| + | {{Main|Mining|Pixel Mines}} |
||
| + | You can find this NPC at the top center of the Pixel Station. He provides some basic information about [[Mining]], and will then tell you to visit [[Pixel Mines|PIXELMINES]]. |
||
| + | |||
| + | ==Jet Race== |
||
| + | [[File:JetRaceNPC.png|thumb|200x110px]] |
||
| + | |||
| + | {{Main|Hangar|Jet Race}} |
||
| + | Jet Race section is located above the PWExchange section and to the left of the Mining Section. In the section, players can find a Jet Race NPC that provides basic information about the Jet Race, as well as providing the player with it's first plane which doesn't appear in the inventory but can be used in the world JETRACE. Upon finishing the dialog, the player can warp to the world HANGAR to try out JETRACE. |
||
| + | |||
| + | ==The Best Set== |
||
| + | [[File:TheBestSetNPC.png| thumb|200x110px]] |
||
| + | |||
| + | {{Main|Mini_Events#The_Best_Set}} |
||
| + | The Best Set section is located to the left of the PWExchange section and above Nether World and World Of The Week section. In this section players can find The Best Set NPC that provides information about The Best Set competition, how to participate and how to vote. Additionally, there is a public Photo Booth where players can take photos of the set they want to submit for the contest and The Best Set contest winner which is displayed at a special pedestal. More information about this event can be found in [[Mini Events]], Winners get 100,000 {{Tooltip|Gems|icon=true}} |
||
| + | |||
| + | |||
[[Category:Dynamic World]] |
[[Category:Dynamic World]] |
||
| + | [[Category:Guide]] |
||
| + | [[Category:Quests]] |
||
Latest revision as of 15:29, 14 January 2024
Daily Bonus
Normal Daily Bonus Reward as of August 2017.
The daily bonus is one of the functions provided to every player other than those banned from Pixel Worlds. You are eligible to receive a free prize every day in the dynamic world of PIXELSTATION. In the world, go to the "Daily Bonus" and spin the wheel to get different prizes. For mobile users you can watch an ad to try your luck once again. The daily bonus refreshes every 24 hours. The prizes change every month.


VIP Daily Bonus
VIP Daily Bonus Grand Prize for the month of September, 2023.
VIP Daily Bonus is an area in the world PIXELSTATION that is only accessible by players with an active VIP subscription.
Once in there, VIP players are able to spin the wheel once and potentially win exclusive prizes as well as the limited VIP Grand Prize. The VIP Daily Bonus refreshes every 24 hours just like its counterpart, the standard Daily Bonus.
In every major month, the VIP Grand Prize item is replaced and the past grand prizes will be unobtainable unless you trade with other players who have them.


PWExchange


The PWExchange. This little fellow on your left can exchange your World Locks into Byte Coins. These Coins are used to buy stuff in the  PWE Terminal, which are located around the world PIXELSTATION, or can be bought from the shop for 49,000
  Gems. Byte Coins can also be bought for Gems in the "Gems & Coins" section of the shop.
| PWE Exchange exchange prices | |
|---|---|
| World Locks/Gems | Byte Coins |
1x  World Lock World Lock
|
219  Byte Coins Byte Coins
|
| 10x World Locks
|
2,190 Byte Coins
|
1x  Platinum Lock Platinum Lock
|
21,900 Byte Coins
|
| 800 Gems
|
50 Byte Coins
|
| 4,000 Gems
|
250 Byte Coins
|
| 24,000 Gems
|
1,500 Byte Coins
|
| 96,000 Gems
|
6,000 Byte Coins
|
Butterfly Hunt

Item Bank


The Item Bank is located right between the Clans and Pet Shop section. The interior can be described like this: large vault door with a Bank Bot beside it. In here, players will most likely encounter the Bank system of Pixel Worlds for the first time. The bot can also be purchased in the Shop for 17,500 Gems. The  Bank Bot allow players to store any items, including untradeable ones. However, they would have to purchase slots in the Bank using Gems to store more items. Here is the list of how much it costs to purchase more slots in the Bank:
| Slots | Cost |
|---|---|
| 5 | 8,250 Gems
|
| 10 | 18,000 Gems
|
| 15 | 42,000 Gems
|
| 20 | ? Gems
|
| 25 | ? Gems
|
Pet Shop

The owner of the Pet Shop, Christina, together with her sister, Nelly, lets you exchange either  Bronze Bubblegum Token,
  Silver Bubblegum Token or
  Golden Bubblegum Token for rare items such as
  Spectrum Gun and
  Spectrum Jetpack. Both Christina and Nelly are obsessed about bubblegum! They love to blow big bubbles!


World of the Week

Every week, the developers select a world made by players that will be nominated as the World of the Week. The chosen world gets featured in the World of the Week section in the Top Rated Worlds and in the Pixel Station's WOTW section. As of the 1.1.30 Update, winners will get a  WotW Trophy and 10 Days of VIP as a reward for their hard work. Click here for the list of World of the Weeks.
Netherworld


The Nether Vendor is located on the bottom-left side corner of PIXELSTATION that sells  Red Scrolls and
  Red Portal to players for Gems. These items can also be found in the shop.
"Hello there! Want to enter the Netherworld to fight monsters and loot gems? These scrolls will grant you access."
If you see him in the Netherworld, be careful about what he says, he might carrying some...secrets...
Daily Quests
Daily Quests are quests that players get on a Daily Basis. Players get 3 quests every 4 hours (they can't have more than 3 quests at a time and the timing is reduced to 2 hours if the Quest Hoarder perk is equipped), completing them will yield some rewards such as  XP, Gems or Items. Players can cancel a quest at any time and a new quest will appear after 4 hours(2 hours with perk equipped).
Old Fisherman


Old Fisherman provides basic information about fishing, and is located in the "Fishing" section in Pixel Station. He has a portal leading to FISHING-101 to his right.
Fishmonger
The Fishmonger buys all types of fishes for a certain ammount of Gems which depends on three factors, the size, the specie and the ammount. You can find The Fishmonger on the Pixel Station or you can directly sell your fish through a  Fish Barrel, the prices for all the species and their respective sizes are listed below:
Note: The Fishes' images are the Huge versions of the fish.
| Fish | Tiny | Small | Medium | Large | Huge |
|---|---|---|---|---|---|
 Herring Herring
|
10 Gems
|
40 Gems
|
70 Gems
|
100 Gems
|
300 Gems
|
 Kingfish Kingfish
|
10 Gems
|
40 Gems
|
70 Gems
|
100 Gems
|
300 Gems
|
 Goldfish Goldfish
|
15 Gems
|
60 Gems
|
105 Gems
|
150 Gems
|
600 Gems
|
 Butterflyfish Butterflyfish
|
15 Gems
|
60 Gems
|
105 Gems
|
150 Gems
|
600 Gems
|
 Carp Carp
|
20 Gems
|
80 Gems
|
140 Gems
|
200 Gems
|
600 Gems
|
 Halibut Halibut
|
20 Gems
|
80 Gems
|
140 Gems
|
200 Gems
|
600 Gems
|
 Sea Angler Sea Angler
|
30 Gems
|
120 Gems
|
210 Gems
|
300 Gems
|
900 Gems
|
 Tuna Tuna
|
40 Gems
|
160 Gems
|
280 Gems
|
400 Gems
|
1,200 Gems
|
 Acid Puffer Acid Puffer
|
80 Gems
|
320 Gems
|
560 Gems
|
800 Gems
|
2,400 Gems
|
 Dumb Fish Dumb Fish
|
5 Gems
|
10 Gems
|
30 Gems
|
50 Gems
|
100 Gems
|
 Piranha Piranha
|
30 Gems
|
120 Gems
|
210 Gems
|
300 Gems
|
900 Gems
|
 Crab Crab
|
320 Gems
|
1280 Gems
|
2240 Gems
|
3200 Gems
|
9600 Gems
|
Fisherman's Fashion


Fisherman's Fashion can be found in the Pixel Station. You can buy items from the vendor that can improve various fishing skills and you must have certain Fishing Ingredients and amount of Gems to buy the items. The items available can be found below with all the necessary information:
Tournaments and World Records


In this section you can find information about the Fishing Tournaments and the current world records related to the Fish weights of each type.
Fishing tournaments are a weekly event in which you can take part by buying a Cup Ticket, although when you buy a ticket for a certain Cup you can't enter in other ones. Once you buy it, you will have a limited amount of time to score points for the tournament, if you're not happy with your score you can try to improve it by buying new Cup Ticket's. Each Cup has different aims and prizes.
Important Note: Once a ticket is active, the fishes you catch which are admitted in the tournament will not be kept in your inventory!
Baby Cup

The price of each Cup Ticket for this tournament is 10 Byte Coins, more information below:
Baby Cup Weight Competition Rules:
- Species Allowed: All or just a specific specie
- Sizes Allowed: Tiny, Small, Medium
- Rod Types Allowed: All
- Gear: Allowed


Fisherman's Cup

The price of each ticket for this tournament is 20 Byte Coins, more information below:
Fisherman's Cup Weight Competition Rules:
- Species Allowed: All or just a specific specie
- Sizes Allowed: Small, Medium and Large
- Rod Types Allowed: All
- Gear: Allowed


Pro Cup

The price of each ticket for this tournament is 40 Byte Coins, more information below:
Pro Cup Weight Competition Rules:
- Species Allowed: All or just a specific specie
- Sizes Allowed: Medium, Large, Huge
- Rod Types Allowed: All
- Gear: Allowed


Clans
Clans section is located above the butterfly Section of the Pixel Station. There is a Clan NPC located in the section that provides brief description about clans. The NPC is useful for new players.
Mining


You can find this NPC at the top center of the Pixel Station. He provides some basic information about Mining, and will then tell you to visit PIXELMINES.
Jet Race


Jet Race section is located above the PWExchange section and to the left of the Mining Section. In the section, players can find a Jet Race NPC that provides basic information about the Jet Race, as well as providing the player with it's first plane which doesn't appear in the inventory but can be used in the world JETRACE. Upon finishing the dialog, the player can warp to the world HANGAR to try out JETRACE.
The Best Set


The Best Set section is located to the left of the PWExchange section and above Nether World and World Of The Week section. In this section players can find The Best Set NPC that provides information about The Best Set competition, how to participate and how to vote. Additionally, there is a public Photo Booth where players can take photos of the set they want to submit for the contest and The Best Set contest winner which is displayed at a special pedestal. More information about this event can be found in Mini Events, Winners get 100,000 Gems